![DNA-B-Primary_White (7).png]](https://kb.dnabehavior.com/hs-fs/hubfs/DNA-B-Primary_White%20(7).png?height=50&name=DNA-B-Primary_White%20(7).png)
Overview of the Discovery SDK
The Discovery SDK is an embeddable <iframe> tag, compatible with HTML-based applications, such as those built in Angular, React, Vue.js, Svelte, or Solid.js. It requires minimal configuration; once key information is securely provided, the SDK is ready for use.
Our team is available to provide a demo of the Discovery SDK. Contact us today to schedule a customized demo and learn more about how the SDK can benefit your organization. Contact us here to get started!
You can explore our interactive step-by-step guide on how to set up the SDK directly on our website. It walks you through the entire process and shows how easily it can be implemented: https://behaviorallyconnected.com/
What You’ll Need:
- Iframe Configuration: Provided in this article (see below)
-
A Key Vault for Secure Storage: The SDK needs secure, private Account Details associated with your account to be stored on your end. These Account Details should be stored in a key vault on your end to ensure account security. The details you will need to secure include:
- accountId: Obtain this from your DNA Web App settings page.
-
Encryption Key: Create a ticket and request your encryption key.
- Subscription Key (DNA API Key): Available in the DNA Developer Portal. Click here for instructions.
- Self-Registration Details: Log into your DNA Web App account, select the desired self-registration process for your embedded discovery, and copy the corresponding link.
- Note your
selfRegistrationIdfrom your account. - Format of URL:
https://discovery.dnabehavior.com/investor/Demo/{accountId}/{selfRegistrationId}
- Note your
Note: The Embedded Discovery SDK must be placed behind your authentication process. You are responsible for verifying user identities through your own username and password checks.
Note on Key Vaults: Store these keys securely using services like AWS, Azure, or environment files. Never expose or commit them to public repositories like GitHub.
Note: A Named User must be designated as the primary user for accessing the Developer Portal—preferably your organization’s lead developer. If your firm would like this to be someone other than an existing Named User, an additional Named User license will be required.
Compatible Tech Stacks
The Discovery SDK is an iframe-based embed and works with any web environment that supports standard HTML and the browser postMessage API. The following are confirmed compatible:
- Angular
- React
- Vue.js
- Svelte
- Solid.js
- Plain HTML / Vanilla JavaScript
Environments That Require Additional Handling
Some environments support the SDK but need implementation adjustments:
React Native (WebView) The standard contentWindow.postMessage() method does not work inside a React Native WebView. Use injectJavaScript or the WebView message bridge instead to pass the encrypted subscription key after the iframe loads.
Next.js (SSR / App Router) The iframe must be rendered client-side only. Wrap the embed in a component with use client and ensure the postMessage call fires after mount, not during server-side rendering.
Flutter WebView / Android WebView / iOS WKWebView Native webview environments have their own JavaScript bridge implementations. Standard postMessage targeting may behave differently. Test your bridge setup before going to production.
What Is Not Supported
The SDK is not designed for:
- Non-browser environments (Node.js scripts, native mobile apps without a webview layer)
- Environments where iframes are blocked by Content Security Policy without explicit allow rules
Encrypting the Subscription Key
To encrypt your subscription key, use the jsencrypt package:
Package Link: jsencrypt
const publicKey = environment.publicKey;
const encryption = new JSEncrypt();
encryption.setPublicKey(publicKey);
const encryptedKey = encryption.encrypt(environment.SubscriptionKey);
Iframe Configuration:
The Discovery SDK is embedded as an <iframe> tag within your HTML document. This is similar to embedding any other iframe-based element with additional required parameters for configuration.
Embedding Format:
Use the following structure to embed the SDK in your HTML document, replacing placeholder values (highlighted in bold) with actual data:
<iframe src="https://embeddiscovery.dnabehavior.com/?accountId={accountId}
&selfRegistrationId={self_registration_id}
&questionPattern={questionPattern}
&firstname={firstname}
&lastname={lastname}
&email={email}"
height="1080px"
width="1920px">
</iframe>
For an optimal user experience, it’s recommended to load the SDK in a new route within your app and display it in full screen. This ensures that the SDK takes up the entire screen, providing a clean and immersive interface instead of a smaller embedded box.
Parse the following code when loading the iframe:
this.iframe.nativeElement.onload = () => {
  const encryptedKey = 'YOUR_ENCRYPTED_KEY';
  const messageTarget = 'https://embeddiscovery.dnabehavior.com/'; //Discovery SDK baseUrl
  this.iframe.nativeElement.contentWindow?.postMessage(
    encryptedKey,
    messageTarget
  );
};
Tip: Customize the height and width attributes in the <iframe> to control display dimensions and ensure mobile responsiveness.
The SDK iframe is mobile-responsive. Adjust the iframe’s height and width attributes to ensure proper display across devices.
- subscriptionKey: The encrypted DNA API key for your account, accessible in the Developer Portal.
- accountId: Your unique account identifier.
- questionPattern: Choose one from the options: 11, 17, or 46.
- selfRegistrationId: Used for self-registration processes.
- firstname & lastname: Required to personalize the questionnaire experience.
- email: Identifies the individual user and ensures a consistent experience.
Note: If you wish to anonymize the client’s email you may do so, however, each email address in the DNA Platform must be unique.
Important Design Note:
If a user completes the 11 or 17 question model and later needs to take the full discovery, they’ll need to use a different email address (or an alias of the original). The system treats each email as a unique record, so it won’t allow a second assessment under the same address.
This setup is intentional. It keeps data clean and ensures each profile reflects one consistent experience.
Using the SDK
Flow and User Experience
- Initialize SDK: When users access the iframe, the SDK will automatically check that all required parameters are present. Missing parameters will result in an error screen.
- Instructions Screen: Users will first see an instructions page with guidelines for completing the questionnaire. They must acknowledge these instructions to continue.
- Questionnaire Completion: Users complete the questionnaire, which takes them through a series of questions.
- Data Processing: Once completed, the system makes API calls to calculate user scores.
- Dashboard and Insights: After scoring, users are redirected to a dashboard where they can view their results and insights.
Customizing the Results Screen with Your Own UI
To display a custom UI for the results screen after the questionnaire is completed, simply listen for the event sent by the SDK. When the screenChanged event is detected with the value dashboard, this indicates the completion of the questionnaire. You can then transition to your own UI for the results screen, providing complete control over the design and flow of the post-questionnaire experience.
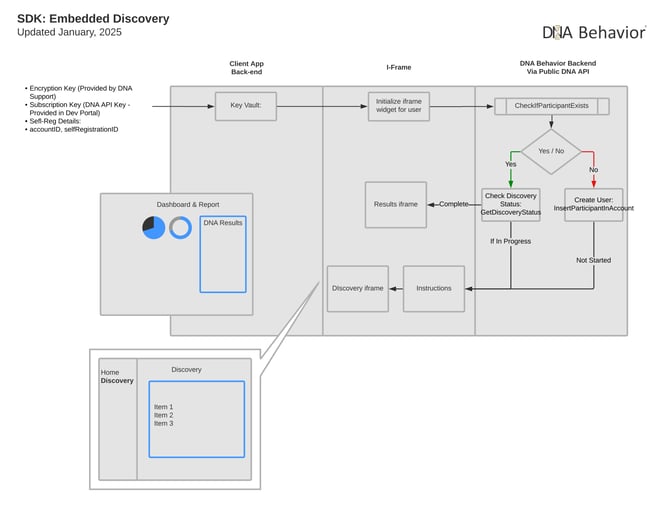
.png?width=670&height=375&name=image%20(4).png)
Embedded Discovery SDK Process Flow Chart
Multi-Language Support:
The SDK includes multi-language options, which allow users to change languages according to their preferences. An Instructions button in the header is accessible at any time for guidance on the questionnaire process.
The supported languages are:
-
- Afrikaans
- Dutch (Netherlands)
- English (UK)
- English (US)
- French (Canadian)
- French (France)
- German
- Hindi
- Mandarin Chinese
- Portuguese (Brazil)
- Portuguese (Portugal)
- Spanish (Mexico)
- Spanish (Spain)
- Urdu (Pakistan)
Multiple Account Access:
Each account in the DNA Web App has its own secure DNA API Key. If your organization leverages multiple accounts, each will require its own set of records in your Key Vault. Additionally, you will need to develop the internal logic to feed this information to the iframe parameters.
Note: Store the subscription key in an environment file. Never hard-code it into your codebase.
Enhanced User Experience Features
-
Automatic Progress Tracking:
If a user exits the questionnaire before completion, the SDK automatically saves their progress. When they return and login, they are redirected to the last question they answered, ensuring a smooth and uninterrupted experience. -
Direct Results Dashboard Access:
Once a user completes the questionnaire, any subsequent login will bypass the questionnaire and redirect them directly to their results dashboard. This allows users to efficiently review their insights without needing to retake the questionnaire.
Webhook Notifications: Real-Time Data Integration
Need a way to get notified when a client completes their profile through the SDK? With the DNA API's webhook functionality, you can set up real-time notifications that integrate directly with your system. Here’s how you can get started:
Step 1: Register Your Webhook URL
To start receiving notifications, you first need to register your webhook URL to your Account ID. Follow these steps:
- Log in to the Developer Portal
- Visit the DNA Behavior Developer Portal and log in with your Web App account.
- After logging in, navigate to the Public API section.
- Search for the RegisterWebhookURL API.
- Registering Your Webhook
- Account ID and Webhook URL: Enter your Account ID and the Webhook URL where you want to receive notifications.
- Make sure you set the status as
Trueto activate the webhook.
API Request Example:
{
    "accountId": 1234,
    "webhookURL": "https://yourdomain.com/webhook",
    "status": true
}
Once the registration is successful, you’ll receive a confirmation with a 200 OK status, indicating that your webhook is active and set up.
Successful Registration Response:
{
    "message": "Webhook registered successfully.",
    "statusCode": 200
}
Step 2: Receive Profile Completion Data
Once your webhook is set up, you’ll start receiving notifications in real time when a user completes their profile. The data will be sent as a JSON payload containing key information such as:
- PersonID
- CreditID
- UserName
- AccountID
- AssignedNameUser
- Tags
- DiscoveryType
- DiscoveryCompletionDate
Sample Data Payload:
{
    "PersonID": 12345,
    "CreditID": 67890,
    "UserName": "john_doe",
    "AccountID": 1234,
    "AssignedNameUser": "John Doe",
    "Tag": [
        {
            "TagID": 1,
            "TagName": "VIP"
        }
    ],
    "FirstName": "John",
    "LastName": "Doe",
    "FullName": "John Doe",
    "DiscoveryType": 11,
    "DiscoveryCompletionDate": "2025-01-23T10:30:00"
}
Step 3: Retrieve Your Webhook URL (If Needed)
If you ever need to retrieve or verify your registered webhook URL, you can do so using the GetWebhookURLByAccountID API. Simply provide your Account ID in the request.
API Request Example:
GET https://api.dnabehavior.com/prod-public-api/Accounts/GetWebhookURLByAccountId/{AccountId}
Successful Response Example:
{
    "message": "Webhook URL retrieved successfully.",
    "data": {
        "accountId": 1234,
        "webhookURL": "https://yourdomain.com/webhook",
        "status": true
    },
    "statusCode": 200
}
Step 4: Update or Overwrite Your Webhook URL
If you need to update or overwrite the existing webhook URL, simply re-register the new URL using the RegisterWebhookURL API. You can then verify the update with the GetWebhookURLByAccountID API.
By following these steps, you can easily integrate webhook notifications into your system and receive real-time updates when a profile is completed. This ensures that you have the most up-to-date data at all times.
Still Need Help?
Submit a ticket here.