![DNA-B-Primary_White (7).png]](https://kb.dnabehavior.com/hs-fs/hubfs/DNA-B-Primary_White%20(7).png?height=50&name=DNA-B-Primary_White%20(7).png)
Zapier has been recently launched and is currently in its Beta phase for all DNA Behavior subscribers. We encourage you to explore and utilize this new service, keeping in mind that, as a Beta version, it may have some limitations and potential areas for improvement. Please share your feedback on Zapier as you use it.
For a successful Zapier integration with the DNA Web App, ensure you have: an active DNA Behavior subscription, your Account ID, API keys, and an active Zapier account. Follow our step-by-step guide below to complete these prerequisites and start building your first Zap. You can watch the video, or follow along with the detailed steps below:
Watch the Setup Video:
Identify your Account ID:
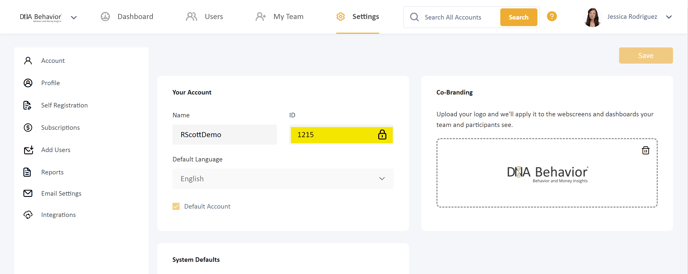
How to Access Your Account ID:
-
Log into DNA Web App: Start by logging into your account at DNA Web App.
-
Navigate to Settings: Once logged in, select the Settings tab.
-
Find Your Account ID: In the "Your Account" section of the Settings, look for the ID field. The number you see here is your Account ID.
Generating Subscription Keys:
At DNA Behavior, we understand the importance of security and privacy in all our integrations, particularly when connecting with external platforms like Zapier. To ensure a secure and reliable connection, the use of Subscription Keys, commonly known as API keys, is mandatory for integrating your Zapier account with the DNA Behavior system. These keys act as a secure token, authenticating and authorizing the connection between Zapier and your DNA Web App account.
The Subscription Key is unique to your account and serves as a safeguard, ensuring that only authorized users can create and manage Zaps involving DNA Behavior data. This approach not only enhances security but also maintains the integrity and confidentiality of your data. We recommend regenerating the keys from time to time to ensure account security.
Step 1: Access the Developer Portal
- Begin by visiting the DNA Behavior Developer Portal at developers.dnabehavior.com. This portal is your gateway to all developer-related resources.
Step 2: Sign In or Sign Up
- Click on the "Sign in or Sign up" button. This action will redirect you to the login page. Please sign in using the same username and password that you use for the DNA Web App.
Step 3: Navigate to Products
- Once logged in, locate and select the menu item titled "Products." This page showcases a list of API and developer products available for subscription, including the one needed for Zapier integration.
Step 4: Select the 'Integrations' Product
- Find and choose the product named "Integrations." This specific product is designed to facilitate connections like the one you're establishing with Zapier.
Step 5: Define Your Integration
- In the 'Name' field, clearly describe the integration you are setting up. Type "Zapier" in this field to specify your intent to integrate with Zapier.
Step 6: Agreement to Terms of Use
- Carefully read and review the Terms of Use. Once you have understood and accepted these terms, check the box indicating your agreement.
Step 7: Subscribe
- After agreeing to the Terms of Use, click on "Subscribe." This action confirms your subscription to the selected product and is a crucial step in generating your API key.
Step 8: Retrieve Your API Keys
- Post-subscription, your API keys will be available in the Profile menu. These keys are vital for establishing a secure connection between Zapier and your DNA Web App.
DNA Behavior provides you with two API keys (primary and secondary). It's a good practice to use different keys for different apps. Additionally, we recommend you regenerate your keys on a regular basis to ensure security of your data.
Creating Your First Zap with DNA Behavior
After setting up your Subscription Keys, the next step is to create your first Zap. A Zap is an automated workflow that connects your apps and services. Here, we'll guide you through the process of creating a Zap using DNA Behavior on Zapier.
Step 1: Sign Up or Log In to Zapier
- Visit Zapier's website and sign up for an account. While Zapier is a paid service, they often offer promotions or free trials which can be a great way to get started without any immediate cost.
- If you already have an account, simply log in.
Step 2: Access DNA Behavior on Zapier
- Once logged in, you can find the DNA Behavior integration in two ways:
- Use the search bar at the top and type "DNA Behavior."
- Alternatively, go directly to the DNA Behavior app page on Zapier by clicking here.
Step 3: Explore DNA Behavior Integrations
- On the DNA Behavior app page, you’ll find various pre-made Zaps and information on how DNA Behavior can be integrated with other apps.
- Take some time to familiarize yourself with the available options and how they might benefit your workflow.
We have found the easiest Zap to try first is the Google Sheets Zap for syncing all participants, found here.
Step 4: Start Creating Your Zap
- Choose a pre-made Zap or create a new one from scratch by selecting "Make a Zap" or similar options.
- When creating a new Zap, you’ll first choose a Trigger (an event in an app that starts the Zap) and then an Action (the event that completes the Zap).
Step 5: Set Up Your Trigger
- Select DNA Behavior as your trigger app. You might be prompted to connect your DNA Web App account using the API key you generated earlier.
- Choose the specific trigger event from DNA Behavior that you want to start your Zap.
Step 6: Choose Your Action
- After setting up the trigger, select the app where you want the action to occur. This could be sending an email, adding information to a spreadsheet, or anything else offered in the vast range of integrations on Zapier.
- Configure the action details according to your needs.
Step 7: Test and Activate Your Zap
- Before activating, test the Zap to ensure it works as expected. Zapier will guide you through this testing process.
- Once you're satisfied with the setup, activate the Zap.
Conclusion
You have now successfully created your first Zap with DNA Behavior! This Zap will automate tasks between DNA Behavior and other apps, saving you time and increasing productivity.
Additional Tips
- Regularly check and update your Zaps to ensure they continue to meet your evolving needs.
- Explore various combinations of triggers and actions to fully leverage the automation capabilities of Zapier.
Support
Should you encounter any challenges or require assistance, we recommend using Zapier's help center and community forums, which are excellent resources for troubleshooting. For issues specific to DNA Behavior, please do not hesitate to contact our support team, who are dedicated to providing personalized assistance.
Additionally, please be aware that some adjustments may be necessary to ensure compatibility with your CRM's specific configurations. If you need further support with the setup process, Zapier provides a directory of experts—consultants who specialize in Zapier integrations. Many clients have found success hiring through this resource, which you can view here: Zapier Experts (Click Here)
Building your first Zap:
Now that you have connected DNA Behavior and Zapier, let's build your first zap. Watch the following video to make your first Zap.